too small) and must be redesigned, according to rules that require fractions
calculations (Figure 3).

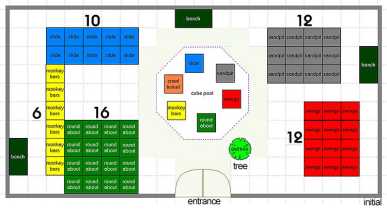
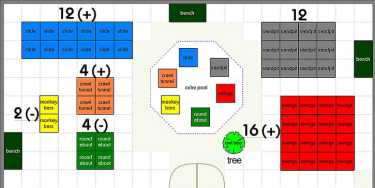
Figure 3. The footprint of the playground on the left image shows the initial layout of the
playground; the footprint on the right illustrates one of the possible correct designs (green:
roundabout, yellow: monkey bars, blue: slide, grey: sandpit, red: swings, orange: crawl
tunnel).

The swings, for example, initially cover a 3 x 4 area, that is twelve blocks.
The scenario requires that the area be increased by comparing two fractions
(the fractions 1/3 and 1/4) and choosing the number that represents the larger
amount. In this case, the fraction 1/3 which results in 4 blocks must be chosen
and the 4 blocks must be added to the swings area, by picking blocks from the
central pool and placing them on the 4 tiles that need to be covered.
4.3. Scripting interactivity: system feedback mechanisms
The system provides both direct and implicit visual and audio feedback to
respond to the children’s activity. The overall scenario and goal is presented
to the participant by a virtual owl (Figure 4), while the rule for each area is
provided by a coloured bird, which floats over that area and talks to the
participant when clicked upon. The participant’s interaction device (or “magic
wand”) includes a joystick for navigating the environment and three colour-
coded buttons: the red button which allows the participant to switch between
“block mode” (in which construction takes place) and “playground mode” (or
review mode); the grey button which is used for picking and placing blocks
and clicking on birds; and the blue button which is used to toggle between the
default ground view and the top-down view of the playground.
When the participant constructs a correct area for an element (by either
adding or removing blocks according to the rules), the ‘red’ button on the
wand must be pressed in order to switch to “playground mode” and
immediately see the playground element appear in place of the blocks. If the
11
More intriguing information
1. The name is absent2. Regional specialisation in a transition country - Hungary
3. Evaluating the Success of the School Commodity Food Program
4. DETERMINANTS OF FOOD AWAY FROM HOME AMONG AFRICAN-AMERICANS
5. Citizenship
6. Spousal Labor Market Effects from Government Health Insurance: Evidence from a Veterans Affairs Expansion
7. GOVERNANÇA E MECANISMOS DE CONTROLE SOCIAL EM REDES ORGANIZACIONAIS
8. Special and Differential Treatment in the WTO Agricultural Negotiations
9. GROWTH, UNEMPLOYMENT AND THE WAGE SETTING PROCESS.
10. Transport system as an element of sustainable economic growth in the tourist region